
Summertime naturally kindles creativity. We’re not bundled up, fighting the frost and flurries. The days are long, the nights are warm, and if your artistic muse is calling, painting on wood is a satisfying way to answer. It’s an especially rewarding craft because the result is durable and often useful.
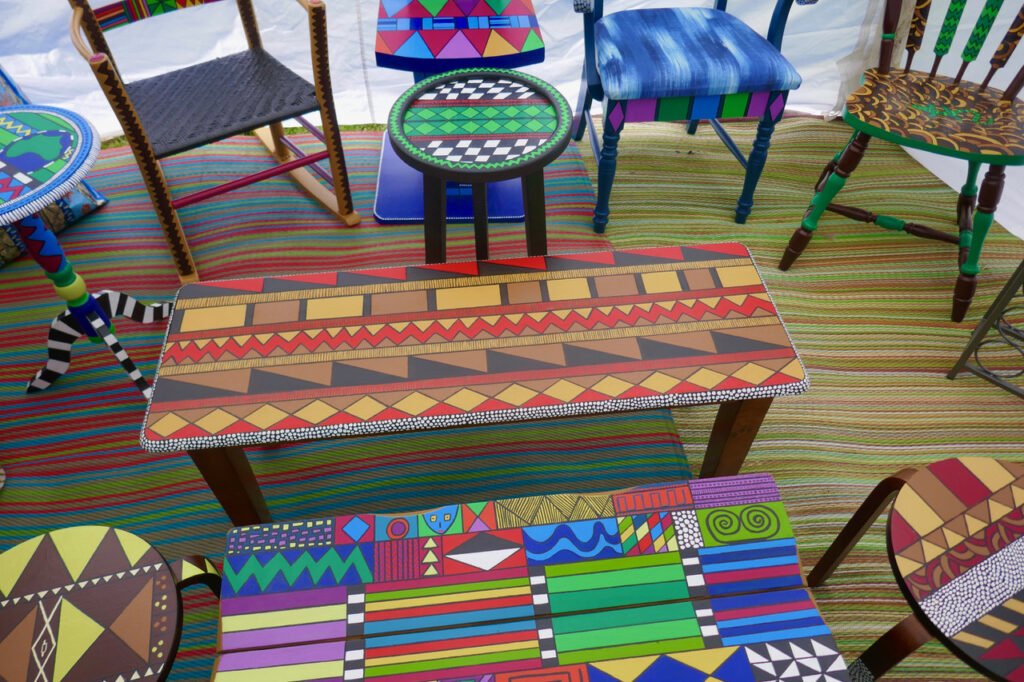
You can paint on wood just the way you paint on canvas, of course, making signs, plaques, and other items to hang on the wall. All good. We think it’s even more interesting to paint wooden THINGS: repurposed furniture, objects, wooden boxes, and toys.
To get started: don’t pay attention to the fact that some art supplies (like free stencils, see resources below) are marketed to kids. So what? Art knows no age. Enjoy yourself!
ABOUT WOOD:
Wood is porous. Its texture will absorb your paint and chew up your brushes. That’s just the way it is.
Unpainted wood is sanded, smooth, and ready for primer and paint. This wooden ware is what you buy at the unpainted furniture store and at art stores.
Used, repurposed items, like old chairs and end-tables, may already be stained or painted. If the surface is shiny, this means it won’t “take” or support water-based paint (acrylics), which is what we recommend using.
If the surface is glossy or shiny, you’ll need to make it “dull,” either by sanding or applying primer in order to create a stable surface for your paint. A piece of furniture with a dull, matte, NON-shiny stain can probably be painted without sanding. As a test, mix a small bead of acrylic paint with a few drops of water, mix, and spread it with a brush (or even a coffee stir-stick!) on the corner of the item you want to paint. If your paint beads up and doesn’t dry, it means that the item has a waterproof coating that will need to be removed or covered.
ABOUT SANDING:
This is why starting with an unfinished, unpainted item is easier. But, if you’re looking at something that’s painted with glossy enamel, the high gloss needs to come off.
You can rent a power sander at Lowe’s or Home Depot. You’ll need an outdoor space if you choose this option. Wear eye protection and a mask, please,
You’ll also find heavy-duty chemical solvents that dissolve paint. Read the instructions carefully: these chemicals are typically toxic, and you need to work outdoors if you’re going to use these solvents. Cover everything with newspaper, and wear eye protection and a mask.
Sandpaper is kinder, gentler, and slower. Sandpaper is graded by “grit” meaning how coarse the abrasive surface is.
A quick sandpaper guide:
- Grit 36-100 is considered coarse, for stripping varnish and paint
- Grit 100-180 is good for final prep before painting
- Grit 180-320 is considered fine. Sometimes, artists use this tiny grit to lightly “scuff” a painted surface between coats, since the paint likes something to grab onto.
Start with the finest, smallest grit, and see how it goes. Between passes, dust off the surface. Before painting, completely towel off the wooden piece with a damp cloth towel, then dry carefully.
Emery paper is good for hand-sanding. Choose paper with a film or fabric backing (vs. paper backing) for easier maneuvering around wooden details. Sanding sponges and steel wool are also handy.
YOU WILL NEED (everything below is available at any art store and online):
- Something to paint. See above regarding what type of wood you’re dealing with.
- Sandpaper, or other resurfacing product, if needed (see above. If you’re painting a “virgin” item of unpainted wood, you won’t need to do this step.)
- Gesso. The “G” is pronounced like a “J”, like in “Jell-o.” This is a very inexpensive primer, traditionally made from finely ground plaster or chalk. These days, it’s made from gypsum, calcium carbonate, and acrylic polymers. Its purpose is to coat the work surface with a smooth medium, to reduce drag and damage to your brushes.
- Brushes. Fine artists spend a fortune on theirs, which are still made from squirrel, sable, boar, and other animal fur. This is frankly no longer necessary. Inexpensive acrylic brushes get the job done for pennies vs. Benjamins. You will need a one-inch wide brush, and several smaller, finer brushes.
- Paint. We recommend acrylic paint in tubes. We do not recommend oil paints or watercolors for working on wood. Spray paint is also an option. Remember that spray paint should only be used outdoors: the fumes are toxic.
- Mixing surfaces for your paints. We recommend re-using plastic food take-out containers.
- A bucket of water for brushes (while painting, keep brushes wet in the bucket, then wash them out completely under cold running water when you’re finished).
- Paper towels and newspaper (cover your work surface thoroughly).
- Decorations. Check out the thousands of African beads, golden scarabs, cowries, and other motifs at The Bead Chest.
- Glue. There are many kinds. We suggest a hot-glue gun or some form of epoxy/ Krazy Glue/ superglue.
- ModPodge or other acrylic decoupage medium if you want to apply photos to your wooden item. It’s also great for applying paper and fabric to wood, like lining the inside of a box with Kente.
- Krylon or other plastic spray sealer, to give a glossy finish when the paint is completely dry.
- Inspo: Email us HERE for your free golden scarab or cowrie ornament from The Bead Chest (thanks, Sol!).
“Love crafting? Email us today for a free craft treasure. Limited offer. Good while supplies last. First come, first served.”
Email: info@fiftyniftyandmore.com

BASIC STEPS
- Prepare wooden surface, sanding if necessary. Clean the wood surface of all dust and residue.
- Using your wide brush, apply a thin coat of gesso over the entire item. Allow to dry.
- Now the fun begins! You may want to start by painting your item with a background color. Squeeze a quarter-sized bead of paint onto a palette or plastic mixing surface, and wet your brush. The paint should be thin, but not runny. Apply one coat and let dry. Then apply second and third coats until you have the color intensity and coverage you want.
- Your imagination is your guide. Superglue one of Grandma’s jewel-encrusted clip-on earrings (remember how painful those were?) to one corner. Add buttons from the family button box. ModPodge a family photo in a prominent spot. Use Q-tips to make paint dots.
- It can be fun to start with a stenciled shape, paint that into place, let dry, then begin to add fun, free-hand details.
- Keep brushes wet (dunk them in the water bucket) as you work. Once paint dries on a brush, it’s all over.
- When you decide that the masterpiece is complete, spray a light gloss of acrylic sealer over the entire thing and allow it to dry.
- Sign your work! We love using a new, black Sharpie for a really clean line. It’s also fun to use Sharpies on your main design.
- Send us photos of your creations!
FREE STENCILS:
https://www.thesprucecrafts.com/free-stencils-collection-2578367
#


Be the first to comment